


Editor's Note: This post now contains outdated information. You might be interested in SonarLint, an IDE extension that helps you detect and fix quality issues as you write code.
As a quality-first focus becomes increasingly important in modern software development, more and more developers are asking how to find new issues before they check their code in.
For some of you, it's a point of pride. For others, it's a question of keeping management off your back, and for still others it's simply a matter of not embarrassing yourself publicly. Fortunately, the SonarQube developers (being developers themselves) understand the problem and have come up with three different ways of dealing with it: the Eclipse plugin, the IntelliJ plugin, and the Issues Report plugin.
All three allow you to perform a pre-commit check on your code, and the two IDE plugins use incremental mode, which shortens analysis time by looking only at the files you've edited, rather than re-analyzing every file in the project. This recent improvement takes running a pre-commit check on a large project from a productivity drag to just another simple step in the process. You can use incremental mode with the Issues Report plugin too, it's just not the default.
Both IDE plugins support Java, and the Eclipse plugin supports C++ and Python as well. For any other language, regardless of your IDE, you'll want to use the Issues Report plugin, which isn't an IDE plugin at all, but one you install in SonarQube itself.
Eclipse
If you've heard of pre-commit analysis before, it was probably in the context of Eclipse, because the Eclipse plugin has been around the longest. Once you have it installed and configured, you're ready to start working with it.
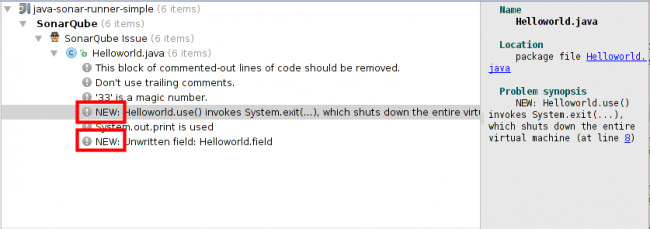
The first thing you may notice after linking your local project with its SonarQube analog is that extra decorators show up in your code.

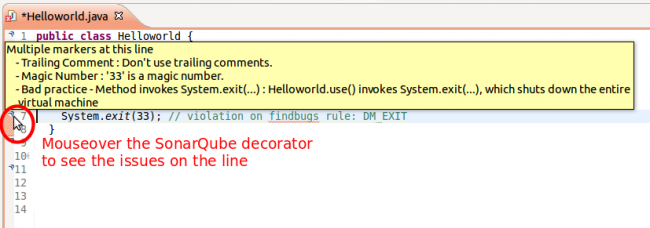
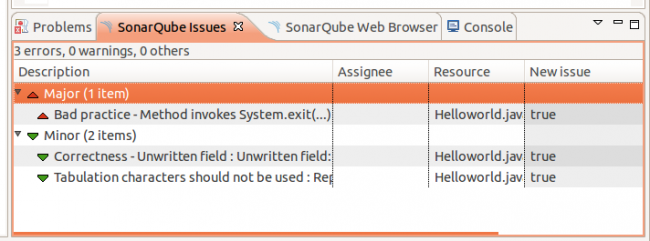
Each decorator marks a line with an existing issue. Mouse over a decorator to get a tooltip listing the issues. There's also a SonarQube Issues view, which gives you a listing of all the issues in the project, but can also be narrowed to show only new issues. Double click any issue to open the relevant file and jump to the appropriate (or rather, "inappropriate") line of code.

When you're ready to commit new code, checking it in SonarQube is easy: right-click the project in the Project or Package Explorer and choose SonarQube > Analyze. By default, any new issues you've introduced will be marked as errors in the Problems tab, so you don't have to go hunting for them; they jump out at you.

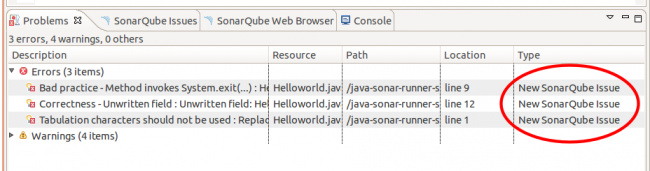
By the way, that behavior's configurable, so if you want new issues demoted from errors to warnings (like some of my day job colleagues) it's easy to do.
IntelliJ
The IntelliJ plugin is the newest addition to SonarQube's pre-commit analysis offerings. As with the Eclipse plugin, you'll need to install and configure it before you can really begin using it.
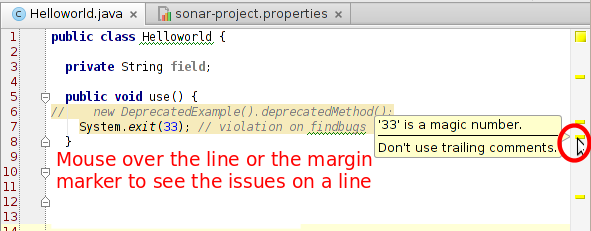
After you link your local project in IntelliJ with its SonarQube analog, lines with existing issues will be highlighted. You can mouse over the line or the corresponding right-margin marker to see the issues.

When you're ready to check your code in, scanning it for new issues has a few more steps than in Eclipse, but still isn't hard. Right-click on the project, choose Analyze > Run Inspection by Name..., search for SonarQube Issues in the dialog, and run the analysis on the whole project (in the next dialog).
An Inspection Results section is added to the window, and new issues are marked as such.

Issues Report
The third way to perform a pre-commit analysis is to use the Issues Report plugin. It installs directly into SonarQube. Once it's in place, you're still not quite done; you'll need to install SonarQube Runner locally. Don't worry about configuring the connection to your SonarQube database, like the installation instructions call for. For the analysis you'll be doing, you only need to specify sonar.host.url.
Then you need to set up a sonar-project.properties file in your project root if you don't already have one. Make sure it includes the property sonar.analysis.mode=incremental. That's what narrows your pre-commit check to only the files you've changed and prevents SonarQube Runner from trying to commit the results to the database.
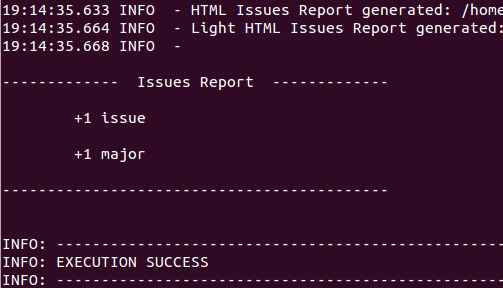
Before you fire your first analysis, there are a few more options to consider. The Issues Report plugin has a couple of configuragions that can be turned on at either the global level or the individual analysis level: sonar.issuesReport.console.enable, and sonar.issuesReport.html.enable. By default both are set to false. As you might guess, sonar.issuesReport.console.enable enables summary reporting in the analysis console. Here's what it looks like:

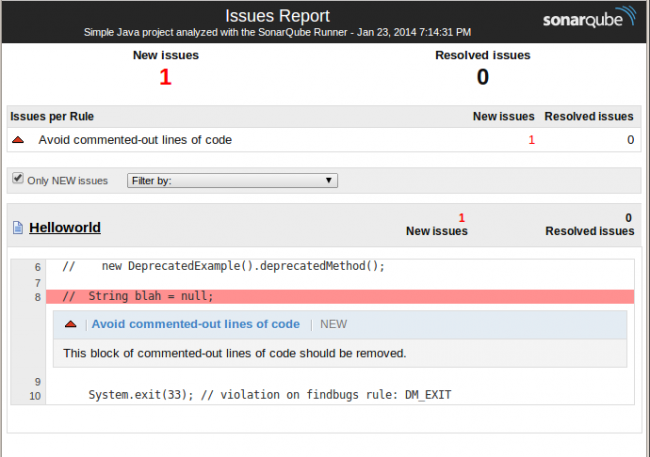
You can use the console report to see if you need to look at the HTML report. (That's assuming you set sonar.issuesReport.html.enable=true. Otherwise all you got was .sonar/sonar-report.json.) Two versions of the HTML report are automatically created, issues-report.html and issues-report-light.html. By default, they land in .sonar/issues-report, but that's configurable. The difference between them is that the light version only shows new issues. The "heavy" version contains all issues, but defaults to showing new issues only:

So that's it. Now, no matter what your language, no matter what your IDE, you too can run a pre-commit check. Happy coding!